Thursday, 17 October 2013

Updating a Family Buffet

I refinished this buffet as a commission for a new client. I met Linda's daughter at the Cole Harbour Harvest Festival last month, where she had bought one of my pieces. Linda got in touch with me and wanted me to refinish a buffet she had. Originally she planned on doing it herself; as you can see in the before picture, she had already started to sand the top half.


We decided to paint the buffet, since there were a lot of tones and different grain lines on the piece. I layered a lighter grey over a darker grey, and distressed the whole piece so the base colour could show through. After using dark paste wax to seal in the paint, I sprayed the existing handles an heirloom white.


The grey colour really gives the buffet an updated, modern look, yet the wax and distressing still give it a little bit of old charm. I really love how this turned out, and I'm even happier that Linda loves it too.


Tuesday, 10 September 2013

Farm House Table

I have seen a few Farm House table tutorials online and in magazines, and really wanted to give it a try! I've had this table for about a year; it's been sitting in my basement, begging to be refinished.


First, I unscrewed the original top from the table base. The top had been covered in mactac, so it was left in pretty hard shape. I painted the entire base in a white, which I mixed into chalk paint (see DIY tab for recipe). After lightly distressing it, I used a dark paste wax to give it that antique look.


For the top, I went to my local building supply retailer and purchased 2 1x6x10' pieces of cheap lumber. I even went so far as to search through the pile to find pieces that had knots, cool grain lines, and even some that had bark left on it. I had them cut into 30" pieces, knowing that I wanted the overall table top to be a square. After connecting them with 2 small pieces of 3" wide slats and finishing nails, I stained the whole thing in Minwax Jacobean. The colour is PERFECT! It looks old, rustic, and well lived in.

 
Overall I love how this turned out! I think I might re-do my dining table in this same look. Stayed tuned!

Back in Black

Today I was at the Cole Harbour Harvest Festival with a selection of my furniture for sale. We sold two pieces and gave away tones of business cards! It's always nice to hear comments from people on your work; it's motivating at the very least! Here is the latest dresser I finished! I loved the rounded mirror and the waterfall style top. I decided I wanted to try a 'pottery barn' type of finish on this piece since it was a lighter colour wood. After painting the entire dresser black with chalk paint, I distressed and waxed it with Minwax Dark Paste Wax. The reason I decided to wax instead of polyurethane, was so that it was left with a very vintage, flat finish. It turned out great! After spray painting the two handles, and adding two crystal knobs for the top, it was ready for sale!


Tuesday, 18 June 2013

Obsessed with Distressed!

If you haven't noticed already, I am OBSESSED with distressed and antiqued furniture. There's something about layered, chippy paint that is so delicious; I want to make every piece look old and something that has a history. This latest dresser highlights my love for this effect.


My Mom found this at HomeSense last summer and it has been sitting in her shed ever since. On the weekend I finally went and got it, knowing it would be perfect for a new painting technique I've been dying to try!
First I painted the whole dresser in a rustic red, knowing that this was going to be the colour of the paint to show through. After two coats of that went on, I then rubbed petroleum jelly over all the places I wanted the top colour to chip off of. As you can see, I went a little nuts with this step. I really wanted it to be heavily distressed, so I put the jelly along a lot of the edges, corners, and on the drawer facings.


After letting the jelly dry for about a hour, I applied two coats of the creamy white, with golden tones painted throughout. Once everything was dry (I waited overnight), I took 200 grit sandpaper and lightly sanded the entire piece. It was amazing how well the creamy white paint came off, revealing the red underneath. In some places I sanded through the red as well to show off the original dark brown of the dresser. A little antiquing wax later and this dresser was transformed from boring to truly unique! I LOVE how it turned out and can't wait to try this technique again!


Thursday, 13 June 2013

Antique Lilac Blue Dresser

WOW! It's been so long since my last post! I've had a lot of other things going on since last summer, but that's still no excuse for neglecting my blog. I'm officially back at re-finishing furniture and am so excited to get this going again! My Mom recently found a fabulous antique dresser for me, which was in pretty hard shape. I was so pumped to re-finish this piece that I had it done, from start to finish, in about 2 days.

I wish I had of taken a before picture of it (sorry Mom!). It must have been stained quite a few times over the years, because the finish was so thick, it look me 3 tries to strip the stain and poly off the top. I re-stained the top in a natural oak (B-UTIFUL!), and painted the body of the dresser in a shade I call Lilac Blue. After shading and waxing, the piece looks amazing! SO shabby chic!

There will be much more to come, I'll keep you posted!


Saturday, 21 July 2012

Market and a Nightstand

Well its been another great day at the Alderney Market! I set up my furniture and some painted signs right by the water today, and what a view that was all day. It couldn't have been better weather, and there were soooo many people around since it's the Tall Ships Festival this weekend. I met alot of really nice people and there was a lot of interest in my stuff. I even sold one of my Chair Planters! You can kind of see it in the picture.

I just finished another project, this time a really interesting nightstand. I found it at Value Village for $14.99; it was quite dated, but I knew all it would take is a little paint and antiquing! Heres the before picture:
After painting it blue and white, I distressed it with 150 grit sand paper and then used dark paste wax to give it that nice aged look. The top needed something, so I stenciled a blue border using painters tape. I think it gave it just that little extra touch of interest!


I've got a great collection of furniture projects to keep me nice and busy this week. My chair planter was popular at the market so I think I'm going to try getting more of those finished. A friend from work has already placed an order! My mom also scored a really awesome dresser at Homesense for $50, it was marked down from $250 since a leg had fallen off! Also, Jen and Jackie found a really great cedar chest for my at a yard sale. I'm so excited to dive right into painting this week, I just wish I didn't have to work! haha.

Thanks for reading!

Wednesday, 18 July 2012

Funky Junk Bench

This week I want to try and get a couple more furniture items finished so I can bring them this weekend, so it will be a busy one for sure. Here’s my latest project which will be at the market on Saturday. It a great bench my aunts found on the curb, and me and mom went to pick up. Someone must have tried to reupholster it before, and man did they ever do a terrible job haha! They used this really dated flower fabric and instead of using a staple gun, they used a million tiny nails. Not only that, but they chose to paint the bench AFTER they upholstered it, so of course there was white paint all over the fabric. All of this added to up a very tough job getting all the old fabric off the bench.


This bench really represents the term “up-cycling”. Not only did I save this from being trashed, but the fabric I used was actually an old curtain that I found at the Salvation Army for $2.99! I loved the print and colours of the curtain, but I had a rip in it and there was only one. I knew I could use it for something so I bought it and tucked it away. The paint was also somewhat recycled. I found it on the mistint table at Kent, so it was only $5 as opposed to $20!

After painting the frame Black, I upholstered the bench seat and two front cushion panels. I ran out of fabric for the back, so I bought this great black material for the two back cushion panels. After that I finished it off by gluing on a red decorative trim to hide the staples.

Monday, 16 July 2012

Success!

The Alderney Farmers Market this weekend went so great! I brought 5 items along with me to introduce Oliver Treasures and to gain interest, and I sold one! I didn’t expect to sell anything, because lets face it, most people who go to a market don’t usually plan on spending $100+ on furniture. I ended up selling my Mexican inspired blue coffee table, which was the first piece of furniture I flipped after starting this. Besides that, I gave out a ton of business cards and talked to a lot of people who stopped to check out my booth! I got so much positive feed back from customers and other market vendors (everyone there is so nice!). Of course I forgot my camera (Ugh!), so I don’t have any pictures to share, but I’ll definitely be taking some this weekend!

Thursday, 12 July 2012

Alderny Farmers Market!


It's official! This saturday I'll be at the Alderny Farmers Market! Located right downtown Dartmouth, this market is a perfect way to get people interested and aware of my little furniture business : ) I plan on having about 6-7 pieces of furniture for sale, but really I'm just trying to get my name out there, I don't imagine I'll sell much this weekend but thats ok!
I feel like I have so much to do now: I have the bench to finish, tags to make, sun catchers to put together, not to mention I have to get everything down to the market! Thank god for Mom's truck haha. I'll post pictures of the market on Sunday!

Tuesday, 10 July 2012

Meet Jack!

I'm back from Quebec and WOW, what a trip! It was so much fun but I'm really happy to be home and working on furniture again, plus I have so much catching up to do! My furniture is going to be featured at the Alderny Farmers Market this weekend which I'm so excited about, but I feel like I'm not ready. I found out that instead of being inside at the market, Ive been given a small barn where I can decorate it however I want and use to display all my things. I don't really expect to sell a lot this week, it's more of a way to show people what I can do. I have today off work, so I'm going to be working all day on getting ready for the market!

Here's a table i have recently finished. This is the before picture.


And here's the after!

Wednesday, 27 June 2012

What a mess!

On Monday me and Mom found this amazing antique sewing table at Value Village for only $30! We were both surprised it was so cheap, and it wasn't until I got home that I found out why. It had this really horrible mac-tac on the top and two sides, when I pulled it off I had a not so lovely surprise. At some point the previous owner must have tried to scrape off the top veneer and in the process, gouged out chunks of the top!


 This is what I'm dealing with right now. I've started to sand off the sticky mess, but its taking forever!


  My original plan was to stain the top and paint the bottom. I'm trying to decide if I should risk staining, on the count of the wood filler may be too obvious, or just paint the whole thing... This project is definitely going to take a lot of elbow grease and patience, I'll post pictures when I'm done!

Sunday, 24 June 2012

A well travelled dresser

I'm so excited how this dresser turned out! I picked this up off the side of the road a couple weeks ago and it had no knobs and looked as if someone had previously attempted to sand it down. The top was half sanded and was a mess. Once again, I really wish i had of taken a before picture : (

The first thing I did was sand down the faces of the 3 drawers. I knew I wanted to make these look like old crates that had postage stamps and other designs on them. I found the design for the middle drawer on a great site called The Graphics Fairy. After transferring the designs on the bare wood, i went over them with a sharpie marker and sanded them a little to make them look aged. I'll add a link to my DIY projects page for complete instructions. I chose to use Minwax Polyshades in the Natural Pine (looks just like an old crate!) and finished the drawers off with some great handles.

 For the body of the dresser I used Burled Redwood from PPG and mixed it to make my own chalk paint. This turned out to be the PERFECT colour! It's nice and rich, warm, and looks like it has a history. After distressing it with 150 grit sand paper, I sealed it with Minwax Paste Wax.

I couldn't be happier how this turned out! I'm definitely going to try this look on another piece soon : )

Thursday, 21 June 2012

A new addition!

I'm just about finished my latest project. This is one of my awesome finds during the curbside giveaway, which means it was free! I already had the paint, so with only spending about $10 for stain and a new brush, it's totally changed. That's definitely my favorite part about furniture flipping, the end result! You can find the Before picture of this desk Here.


After sanding down the top, I used Minwax Polyshades in Antique Walnut. This product is great because it has both the stain and polyurethane in one. Two coats of that was all it needed. Then I mixed up some homemade chalk paint in a nice yellow and green for the body, and then used the dark paste wax for antiquing.

Right now I'm trying to get into the Alderny Farmers Market, I have a meeting next week with the lady in charge of deciding who can be a vender. Hopefully she like my stuff so I can get a tent to display my furniture! *fingers crossed*


Wednesday, 20 June 2012

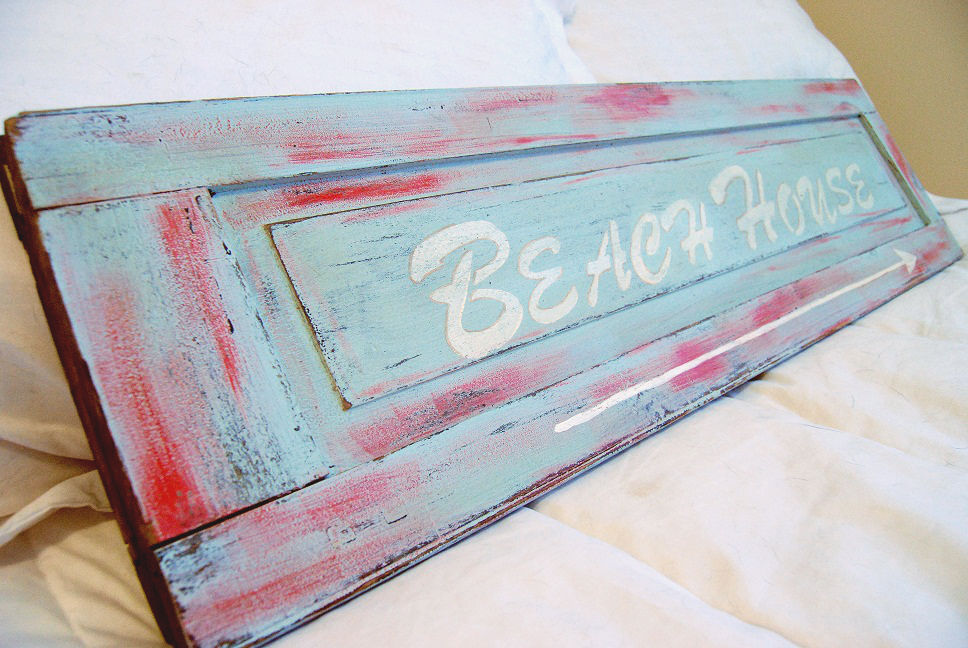
New life to old shutters


I found these great shutters at Renovators Resource and thought they would be perfect to make old signs out of! First I mixed some homemade chalk paint in a grey/blue; once that was dry I stenciled on the lettering in an off white. After dry brushing a bright red on the sign, I distressed the whole thing with my electric sander. All I need to do is get a picture hanging kit and it's done!

Detail:

Tuesday, 12 June 2012

Curbside Giveaway Finds

Last weekend was the HRM's Curbside Giveaway. To anyone who isn't aware of this, it's an event held twice a year in the HRM where you can put anything you want to get rid of at the end of your driveway for others to take. I was sooo excited about it this year, since i knew there would be tones of furniture around town. SO, at 8am on Saturday I got up, quickly got ready, and me and Mom went hunting! I ended up finding some really great pieces. I found a lovely solid wooden dresser and a funky side table, but the best find was definitely this old vanity which had so much potential!

I've already started working on the vanity. As you can see in this picture (sorry about the poor quality, I took it from my phone) I have already sanded the top down to bare wood to be stained. My plan is to stain the top and paint the rest, and also change the hardware. I'll post more pictures with my progress!

Monday, 11 June 2012

First Sale!

I just had to make a quick post about my first sale! I sold the Pie Cabinet to someone who I know will appreciate its funky quality! The money went right into my Portugal fund : )

Friday, 8 June 2012

First Re-Upholstered Chair

In my last post I mentioned how I started my first re-upholstery project on a chair I bought for $14.99 at Value Village. Well here are the results! I’m pretty happy with it, considering it was my first attempt at re-upholstery. I probably could have pulled the fabric tighter on the bottom, and the back could have used a little more padding, but I really like how it looks! So without delay, here’s my first re-upholstered chair : )
                
                      Before:                                                                      After:
                                  

Wednesday, 6 June 2012

Things going on...

I figured I should post an update of what I've been up to lately. Last Sunday I bought a great dining/living room chair from Value Village for $14.99. It was an upholstered wooden chair with woven sides, and it needs LOTS of work. The fabric was really old and dirty (and auqa crushed velvet, ouch!), so I have since ripped that off and taken the seat off the frame. This was a much bigger task then I thought it would be. Who ever built this thing did not want it to be taken apart. It had more glue and staples in the fabric then a Christmas parade float! After I finally got all the fabric off, I painted the chair a nice creamy white, distressed it, and then used Minwax Dark Paste Wax. When I get home I’ll post some pictures of my progress with the chair : )


Today’s my birthday, and at 6am Eric woke me up, made me breakfast, and gave me flowers, chocolate, and a Mastercraft Electric Sander! It’s only us DIY chickies that can appreciate this present, and I tried it before I got a chance to get dressed this morning haha.

Finally, I ordered my own business cards! This is the basic layout, with a some information removed : )

Have a good Wednesday!


Friday, 1 June 2012

Vintage Vanity

This was a vanity that was sitting in my mom's storage for a while, and since she had no room for it, it was given to me! As soon as I saw it I knew exactly what I wanted to do with it. I think that's how the best DIY projects come to be. If you have instant inspiration then it has a better chance of being something great!

I really wish I had of taken a 'Before' picture of this, but my camera decided to be a piece of crap before i started. If you can imagine, this was in really hard shape. It was painted white at some point, because there were traces of the old paint in certain areas, but mostly it was just wood. 

Tuesday, 29 May 2012

Homemade Chalk Paint


I'm so excited that I found this recipe! Chalk paint can be hard to find (as I have discovered with most things), so this homemade recipe is great since the ingredients are accessible! I purchased the plaster of paris from DeSerres for $7.98/ 2kg bag.